
Have you ever wanted to upgrade your Toyota’s sound system but felt intimidated by the tangled mess of wires behind the dashboard? You’re not alone. Many car owners are hesitant to tackle their stereo wiring, fearing a symphony of beeps and malfunctions. But, with the right knowledge and a dash of confidence, you can navigate the world of car audio with ease. This comprehensive guide will unravel the mysteries of Toyota stereo wiring diagram color codes, empowering you to confidently upgrade your sound system and enjoy the music you love.

Image: manualenginefeierabend.z19.web.core.windows.net
Imagine cruising down the highway, the crisp sound of your favorite band filling the car, a custom setup perfectly tuned to your preferences. This dream can become a reality, and understanding the “language” of your Toyota’s wiring is the first step. This guide will demystify the complex world of color codes, making stereo installations a breeze for any car enthusiast.
Diving Deep into Toyota’s Stereo Wiring Language
Toyota, like many other car manufacturers, employs a system of color-coded wires to connect the radio to the various speakers, antennas, and other components in your vehicle. These colors are not random; they follow a standardized system that helps technicians quickly identify and connect the proper wires during installation or repairs. Learning to decipher this system is like unlocking a hidden code, giving you vital knowledge to navigate your car’s electrical network.
The Power of Color: Understanding the System
The most common color codes found in Toyota stereos are:
- Red: Typically signifies a positive (+12V) power source. This wire provides the main power supply to the stereo when the ignition is turned on.
- Black: Represents ground (0V). This wire provides a return path for the electrical current from the stereo unit.
- Yellow: Usually designates a constant power source. This wire provides power to the stereo even when the ignition is off, allowing features like clock and radio presets to retain memory.
Expanding the Color Spectrum: Unmasking Other Wires
While the core colors are fairly consistent across most Toyota models, other wires might require some detective work. Here’s a breakdown of some typical colors and their functions:
- Orange: Can signify illumination, providing power to the stereo’s display or buttons when the headlights are on.
- Blue: Often represents a switched antenna power source. This wire sends power to the antenna when the radio is turned on, enhancing reception.
- Green: May be used for a variety of functions, such as remote control inputs, accessory power, or speaker outputs.
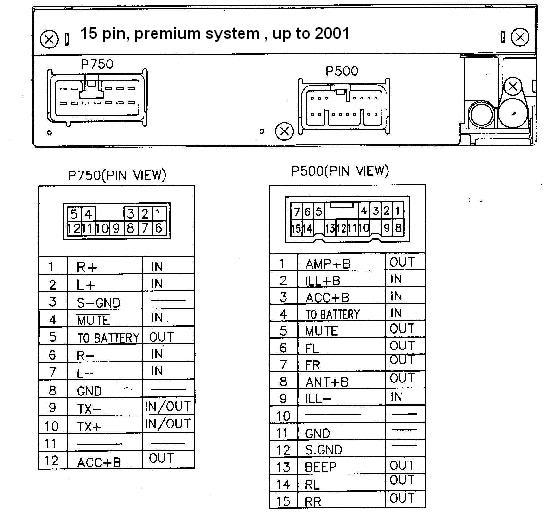
Image: workshoprepairkim123.z21.web.core.windows.net
Decoding the Diagram: The Key to Your Stereo’s Language
To truly understand your Toyota’s stereo wiring, you need to consult the specific wiring diagram for your model and year. These diagrams are readily available online through reputable auto parts websites or by contacting a Toyota dealer. The diagram will provide a visual representation of all the wires, their colors, and their corresponding functions.
Navigating the Diagram: A Visual Guide
The wiring diagram will appear as a complex web of lines and symbols, but don’t let this intimidate you. Here’s a breakdown of what you’ll encounter:
- Terminal Locations: The diagram will show the specific location of each wire at the stereo unit’s connector. This will help you identify each wire once you remove the radio.
- Color Codes: Each wire will be represented by its corresponding color, making it easy to follow the connections.
- Wire Descriptions: Alongside each wire, you’ll find a brief description of its function, like “Right Front Speaker Positive” or “Antenna Power.”
Taking Action: Putting Your Knowledge to the Test
Now that you’ve decoded the language of your Toyota’s stereo wiring, you can confidently tackle a variety of tasks:
- Upgrading Your Radio: With the wiring diagram as your guide, you can easily connect a new aftermarket stereo unit to your vehicle’s existing electrical system.
- Installing Additional Speakers or Accessories: Whether you’re adding rear speakers or a subwoofer, the diagram will guide you through the wiring process with precision.
- Troubleshooting Issues: If you encounter sound problems or malfunctions, you can use the diagram to identify the faulty wire and fix it with ease.
Expert Tips for Navigating the Wiring Maze
To make your wiring adventures even smoother, here are a few expert tips:
- Use Quality Wires: Invest in good quality speaker wire, ensuring a reliable connection and preventing signal interference.
- Use a Wiring Harness Adapter: For a hassle-free stereo upgrade, consider a wiring harness adapter. These adapters simplify the connection process, eliminating the need to cut wires or solder.
- Double-Check Your Connections: Before powering up your stereo, carefully double-check all your connections to ensure they’re secure and accurate.
Toyota Stereo Wiring Diagram Color Codes
Conclusion: Mastering Your Toyota’s Stereo System
By understanding the color code system and utilizing the wiring diagram, you can become a master of your Toyota’s stereo system. This newfound knowledge empowers you to confidently upgrade your sound system, personalize your driving experience, and enjoy the music you love. So, crack open the wiring diagram, put on your mechanic hat, and let the music flow!


