
Ever felt a flicker of anxiety when a warning light illuminates on your dashboard, or when a crucial electrical component inexplicably fails? For Mercedes C200 owners, understanding the fuse box diagram is a vital step in diagnosing and resolving these electrical issues. It’s like having a map to the heart of your car’s electrical system, allowing you to pinpoint the root cause of problems and take action confidently.

Image: fusible-et-relais.com
This article serves as your comprehensive guide to the Mercedes C200 fuse box diagram, revealing its secrets and empowering you to tackle electrical troubleshooting with newfound confidence. We’ll explore the location of the fuse boxes, decipher the meaning of the diagrams, and dive into practical examples of how to use this knowledge to your advantage.
Understanding the Fuse Box’s Role
The fuse box serves as a vital protective shield for your C200’s electrical system. It’s filled with fuses, tiny devices designed to break the circuit and prevent damage to sensitive components in case of an electrical overload or short circuit. Imagine a fuse as a sacrificial hero, willing to burn out to protect the rest of the electrical system from harm.
Each fuse is responsible for a specific circuit in your car, powering everything from the headlights and radio to the power windows and climate control system. A blown fuse indicates a problem in that specific circuit, and replacing it can often restore functionality.
Location, Location, Location: Unveiling the Fuse Box
The Mercedes C200 boasts two main fuse boxes, each strategically located for easy access:
1. Passenger Compartment Fuse Box:
This is the most accessible fuse box, usually found under the dashboard to the left of the steering wheel. It’s a convenient location for addressing common electrical issues.
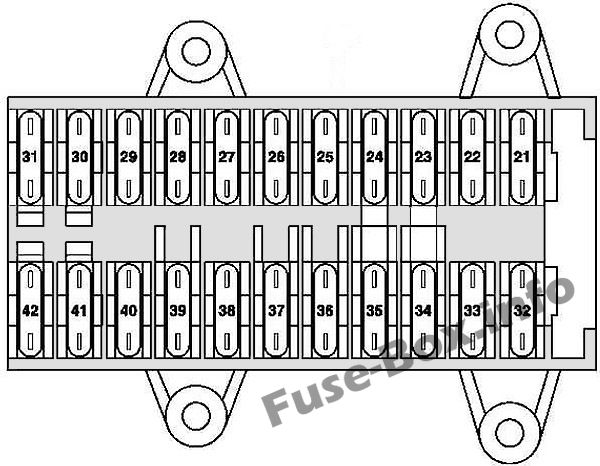
Image: sigorta-kutusu.com
2. Engine Compartment Fuse Box:
Tucked away in the engine bay, this fuse box houses fuses for high-current components like the engine control unit and the lighting system. Accessing it may require a little maneuvering, but it’s essential for addressing issues related to these crucial systems.
Deciphering the Fuse Box Diagram: Your Electrical System’s Map
A fuse box diagram is your key to understanding the layout and function of each fuse within the box. It’s a visual map that provides crucial information, including:
- Fuse Number: Each fuse is assigned a unique number for easy identification.
- Circuit Description: A brief description indicates which electrical component or system the fuse protects. For example, you might find fuses labeled for “Headlights,” “Radio,” “Power Windows,” or “Rear Defroster.”
- Amperage Rating: This tells you how much current the fuse can safely handle before blowing. A higher amperage rating indicates a larger capacity for handling current.
Using the Diagram for Effective Troubleshooting: A Step-by-Step Guide
Now that you understand the anatomy of the fuse box and diagram, let’s put this knowledge into action. Here’s a step-by-step guide for troubleshooting a potential electrical issue with your C200:
Step 1: Identify the Symptom
Start by pinpointing the electrical problem you’re facing. Is it a faulty headlight? A dead radio? Or a malfunctioning power window?
Step 2: Consult the Fuse Box Diagram
Locate the relevant section of the fuse box diagram based on the affected electrical component. For example, if your headlights are out, look for the “Headlights” section on the diagram.
Step 3: Locate the Corresponding Fuse
Use the diagram to identify the fuse number that corresponds to the circuit protecting the malfunctioning component.
Step 4: Inspect the Fuse
Open the fuse box and carefully examine the fuse for any signs of damage. A blown fuse will often have a broken wire or a melted center section.
Step 5: Replace the Blown Fuse (If Necessary)
If you find a blown fuse, replace it with a fuse of the same amperage rating. Improperly sizing the fuse can lead to overheating or further damage.
Step 6: Test the Circuit
After replacing the fuse, test the circuit to see if the problem is resolved. If the issue persists, you may have a more complex electrical issue requiring further investigation.
Important Considerations
While replacing a blown fuse can resolve many electrical problems, it’s essential to remember that it’s only a temporary fix. The root cause of the electrical overload or short circuit needs to be addressed.
Here are some additional points to keep in mind:
- Never Use a Higher Amperage Fuse: Using a higher amperage fuse can overload the circuit and lead to damage.
- Consult a Professional for Complex Issues: If you’re unable to pinpoint the problem or if the issue persists, consulting a qualified Mercedes technician is the best course of action.
- Maintain a Spare Set of Fuses: It’s wise to keep a small selection of common fuses in your car’s glove box for quick fixes.
Mercedes C200 Fuse Box Diagram Pdf
Conclusion: Master Your C200’s Electrical System
Understanding the Mercedes C200 fuse box diagram is an essential skill for any owner. It empowers you to diagnose and resolve many common electrical issues, saving you time, money, and potential headaches. By mastering this diagram, you gain a deeper insight into your car’s electrical system and take a step towards becoming a more informed and confident car owner. Whether you’re a seasoned car enthusiast or a novice driver, embrace the power of the fuse box diagram and unlock the potential of your C200’s electrical system. Happy troubleshooting!


